Search blog

Showing posts with label MySQL. Show all posts

Thursday, February 2, 2023

[SOLVED] - Install phpMyAdmin & LAMP on Ubuntu 20.04 Desktop

Install phpMyAdmin & Linux, Apache, MySQL/MariaDB & PHP [LAMP] on Ubuntu 20.04 desktop.

Below you will find the instructions that I myself have tried and successfully implemented on my system.

 1. Install Apache Web Server

 sudo apt update  
 sudo apt install apache2  

2. Install MariaDB

 sudo apt install mariadb-server  
 sudo apt install mariadb-client  

After that, run the commands below to secure the MariaDB server by creating a root password, disallowing remote root access removing anonymous, and more.
 sudo mysql_secure_installation  
 If you've just installed MariaDB, and haven't set the root password yet, you should just press enter here.  
 Enter current password for root (enter for none): PRESS ENTER  
 Switch to unix_socket authentication [Y/n] n  
 Change the root password? [Y/n] n  
 Remove anonymous users? [Y/n] y  
 Disallow root login remotely? [Y/n] y  
 Remove test database and access to it? [Y/n] y  
 Reload privilege tables now? [Y/n] y  
 All done!  

3. Install PHP

 sudo apt install php7.4 php7.4-common php7.4-mysql php7.4-gmp php7.4-curl php7.4-intl php7.4-mbstring php7.4-xmlrpc php7.4-gd php7.4-xml php7.4-cli php7.4-zip  

4. Install phpMyAdmin

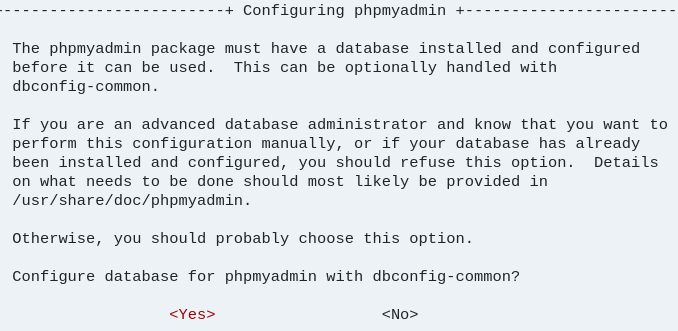
 sudo apt install phpmyadmin  

When prompted to choose the web server, select apache2 and continue.
   
Install phpMyAdmin, Apache, PHP, MySQL or MariaDB on Ubuntu 20.04 Desktop

When prompted again to allow web config-common to install a database and configure select Yes and press ENTER.

Then type and confirm a password.

Install phpMyAdmin, Apache, PHP, MySQL or MariaDB on Ubuntu 20.04 Desktop

After installing phpMyAdmin, open your web browser and browse to the server hostname or IP address followed by /phpmyadmin.
 http://localhost/phpmyadmin  
Install phpMyAdmin, Apache, PHP, MySQL or MariaDB on Ubuntu 20.04 Desktop
If you encounter the following error implement the solution below to resolve the issue:

ERROR: mysqli_real_connect(): (HY000/1698): Access denied for user 'root'@'localhost'

Open your terminal and run the following commands:
 sudo mysql -u root  
 use mysql;  
 update user set plugin='' where User='root';  
 flush privileges;  
 \q  
Now the LAMP cum phpMyAdmin should be working for you.

>> Ref:

Sunday, May 20, 2018

[SOLVED] - Delete Categories in Magento 2 using MySQL & phpMyAdmin

You can use the SQL code below to DELETE your Categories in your Magento 2 installation. It will reset your categories to as it was after a fresh installation.

Copy the code below and execute it as shown in the image:

[SOLVED] - Delete Categories in Magento 2 using MySQL & phpMyAdmin
Click on image to enlarge


Friday, April 6, 2018

Why You Shouldn't Be Using mysqli_fetch_array()?

While researching as to why not to use mysqli_fetch_array(), and instead use mysqli_fetch_row() or mysqli_fetch_assoc(), I ran into this old post, which well explains the reason. The test results for each of these functions may not be as per contemporary test case, but it will still give you a good idea as to why mysqli_fetch_array() shouldn't be used

Benchmark on a table with 38567 rows:

mysql_fetch_array
MYSQL_BOTH: 6.01940000057 secs
MYSQL_NUM: 3.22173595428 secs
MYSQL_ASSOC: 3.92950594425 secs

mysql_fetch_row: 2.35096800327 secs
mysql_fetch_assoc: 2.92349803448 secs

As you can see, it's twice as efficient to fetch either an array or a hash, rather than getting both.  It's even faster to use fetch_row rather than passing fetch_array MYSQL_NUM, or fetch_assoc rather than fetch_array MYSQL_ASSOC.

Don't fetch BOTH unless you really need them, and most of the time you don't.

SOURCE: http://bit.ly/2qaSyFr

Sunday, September 17, 2017

Import SQL File from Command Line (CLI)

Here's a simple way to import your SQL file/dump using your Command Line Interface (CLI) or what is also known as Terminal:
 mysql> USE database_name;  
 mysql> source filename.sql;  
You can use this method to import database, also if your database size is very large and your are facing problems importing it from phpMyAdmin.

Saturday, September 16, 2017

Reset AUTO_INCREMENT Value in MySQL

You can reset the AUTO_INCREMENT value in MySQL either by using a SQL command or by using phpMyAdmin.

NOTE: You cannot reset the counter to a value less than or equal to the value that is currently in use. For both InnoDB and MyISAM, if the value is less than or equal to the maximum value currently in the AUTO_INCREMENT column, the value is reset to the current maximum AUTO_INCREMENT column value plus one.

To reset the Primary Key Value to 1, you should either delete the table and create a new table or TRUNCATE the table and apply the command below. But DON'T do this, if you already have data in your table.

1. Using SQL Command:
 ALTER TABLE table_name AUTO_INCREMENT =1;  

where,
- table_name is the name of the table whose AUTO_INCREMENT value you want to reset.

2. Using phpMyAdmin Operation:
 - First open the table whose AUTO_INCREMENT value you would like to reset.
 - Once inside the table click on the Operation tabs as shown in the image below.

Click on image to enlarge

3. To save the changes you've made, click on Go.

Sunday, January 3, 2016

Updating PHP & MySQL in Ubuntu 14.04

1. Updating PHP 5.5 to PHP 5.6

To upgrade to a newer version of PHP 5.6 on Ubuntu 14.04, you can use Ondřej Surý's PPA. He is one of the Debian maintainers of the php5 package. Also not that this update will overwrite any change you made to your 'php.ini' files. So, I recommend you make a back up of your 'php.ini' file and later on you can use it as a reference file to make changes in your new 'php.ini' file.

To add the PPA and upgrade your packages, run:

 sudo apt-get install software-properties-common  
 sudo add-apt-repository ppa:ondrej/php5-5.6  
 sudo apt-get update  
 sudo apt-get upgrade  
 sudo apt-get install php5  

1. Updating MySQL 5.5 to MySQL 5.6

 step 1 : take a backup  
 mysqldump --lock-all-tables -u root -p --all-databases > dump.sql  
 step 2 : remove old mysql  
 sudo apt-get remove mysql-server  
 sudo apt-get autoremove  
 step 3 : install new version of mysql  
 sudo apt-get install mysql-client-5.6 mysql-client-core-5.6  
 sudo apt-get install mysql-server-5.6  
 step 4 : restore your data  
 mysql -u root -p < dump.sql  

3. If error after logging into phpMyAdmin:

If you happen to get an error as below:

'Your PHP MySQL library version 5.5.46 differs from your MySQL server version 5.6.27.....'

Run the following commands:

 sudo apt-get remove php5-mysql  

You might have to reinstall your phpMyadmin.

To reinstall phpMyadmin enter the following commands:

 sudo apt-get install phpmyadmin  

Friday, October 2, 2015

Upgrade MySQL 5.5 to 5.6 -- Ubuntu 14.04

Step 1 : Take a backup:

 mysqldump --lock-all-tables -u root -p --all-databases > dump.sql  

Step 2 : Remove your older version of  MySQL:

 sudo apt-get remove mysql-server  

 sudo apt-get autoremove  

Step 3 : Install new version of MySQL:

 sudo apt-get install mysql-client-5.6 mysql-client-core-5.6  

 sudo apt-get install mysql-server-5.6  

Step 4 : Restore your data:

 mysql -u root -p < dump.sql  


Monday, July 20, 2015

How To Clear MySQL Screen In Ubuntu/Linux Terminal

While at your MySQL terminal enter the command below:

 mysql> \! clear  

Monday, May 18, 2015

Increasing the Script Timeout Limit in phpMyAdmin in Ubuntu 15.04 and other LAMP Servers

If you are facing problems importing your database dump into your  MySQL server using phpMyAdmin follow the steps below to resovle the issue:

Open the 'config.inc.php' file located inside '/etc/phpmyadmin/config.inc.php' and add the following line:
 $cfg['ExecTimeLimit'] = 0;  

This will remove any time constraint in phpMyAdmin for database import.

Now make the following changes in your 'php.ini' file which is located at '/etc/php5/apache2/php.ini.' You will have to sudo and open your editor to make/commit the changes:
 post_max_size = 750M  
 upload_max_filesize = 750M  
 max_execution_time = 300  
 max_input_time = 540  
 memory_limit = 1000M  

Now finally restart your Apache Web Server:
 sudo service apache2 restart  

Friday, September 5, 2014

Drupal cache_rules error, Error: Tablespace for table abc exists. Please DISCARD the tablespace before IMPORT

I got these queer error today with my site viz:

Error #1. 'cache_rules does not exist in database'
Error #2: 'Error: Tablespace for table abc exists. Please DISCARD the tablespace before IMPORT' in XAMPP using phpMyAdmin & MySQL.

There are various ways to fix these errors. I've listed them below:

Solution 1. Manually create the table using the following SQL query:

DROP TABLE cache_rules ;
CREATE TABLE IF NOT EXISTS `cache_rules` (
  `cid` varchar(255) NOT NULL DEFAULT '' COMMENT 'Primary Key: Unique cache ID.',
  `data` longblob COMMENT 'A collection of data to cache.',
  `expire` int(11) NOT NULL DEFAULT '0' COMMENT 'A Unix timestamp indicating when the cache entry should expire, or 0 for never.',
  `created` int(11) NOT NULL DEFAULT '0' COMMENT 'A Unix timestamp indicating when the cache entry was created.',
  `serialized` smallint(6) NOT NULL DEFAULT '0' COMMENT 'A flag to indicate whether content is serialized (1) or not (0).',
  PRIMARY KEY (`cid`),
  KEY `expire` (`expire`)
) ENGINE=InnoDB DEFAULT CHARSET=utf8 COMMENT='Cache table for the rules engine to store configured items.';


Solution 2: If the above solution doesn't work for you and you get error relating to 'tablespace' saying 'Error: Tablespace for table abc exists. Please DISCARD the tablespace before IMPORT' in XAMPP using phpMyAdmin & MySQL.'

There might be either one of the two or both the files 'tablename.ibd' or 'tablename.frm' files left in the location 'C:\xampp\mysql\data\database_name\' Delete those files, in our case it will be 'cache_rules.ibd' or 'cache_rules.frm.' Your problem should be resolved now and you should be able to create/import the 'cache_rules' table.

You might also check the following solution for your 'tablespace' issue: http://tinyurl.com/me69h6x

Friday, December 21, 2012

Excellent Script to change MySQL Table Prefix in Drupal

Note: This script is applicable to any website using MySQL as its database.

I wanted to change my MySQL table prefix for my Drupal installation and googling and trying various methods that I bumped across in various websites, but to no avail until I landed upon this awesome little script. I've tried and tested this script and it's an excellent little but powerful script to change your MySQL Table prefixes.

Just download the script provided here MySQL Table Prefix Changer and place it in your document root folder. Then enter something like this in your browser "www.example.com/prefix-dxc.php" and fill in the form with the relevant inputs. And within seconds your table prefix should be changed/updated.

Once all's done you will get a final report. One error I noticed during my process was this:

Deprecated: Function mysql_list_tables() is deprecated in C:\xampp\htdocs\prefix-dxc.php on line 109

There is nothing to worry about this as it's just a message telling the above function is no longer supported by my current MySQL version.

Top 5 Posts (Weekly)