Search blog

Showing posts with label Ubuntu. Show all posts

Sunday, November 1, 2020

[SOLVED] Suspend-Resume Not Working in Ubuntu 20.04

If you are unable to suspend your laptop, here's the solution which I've tried & tested and it worked with my Lenovo Thinkpad T440.

 Open your terminal and enter the following commands:

>> Steps 1: Create backup of the following file 'logind.conf':

 sudo cp /etc/systemd/logind.conf /etc/systemd/logind-backup.conf  

>> Steps 2: Depending upon the GUI based code editor you have, such as gedit, Geany etc or text based editor nano or the default vi enter the following command below. If you have & want to use Geany then you can replace vi with geany:

 sudo vi /etc/systemd/logind.conf  

 >> Steps 3: Step 3: Carefully navigate and make sure the following lines are changed to look like shown below. If the lines are commented (Example: #HandleSuspendKey=suspend), uncomment them.

 HandleSuspendKey=suspend  
 HandleLidSwitch=suspend  
 HandleLidSwitchDocked=suspend  

 >> Steps 4: Save the file.

 >> Steps 3: Reboot & check. You can reboot from the terminal using the following command:

 sudo reboot  


Monday, February 17, 2020

Allow Clemetine Remote App Access in UFW [Uncomplicated Firewall]

If you would like to use the Clementine Remote App with your Ubuntu system, then try the following steps:

Allow Access to Clementine Remote App in UFW [Uncomplicated Firewall]
Image 1
 
Image 2
  1. Open Clementine
  2. Open Preferences using the keyboard shortcut (CTRL+P) or open on Tools >> Preferences from the Clementine menu
  3. Click on Network Remote tab on the left, and make note of the following two values:
    • Port
    • Your IP Address
  4. In my case, my IP address was 192.168.0.113
  5. Open your terminal, and enter the following command:
    sudo ufw allow from 192.168.0.0/24 to any port 5500. Please note that if your IP is, say for example 192.168.1.20, then your terminal command should be as:
    sudo ufw allow from 192.168.1.0/24 to any port 5500
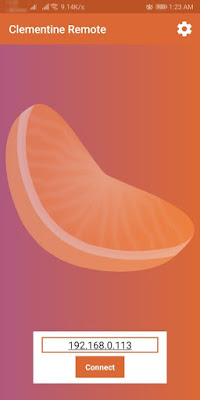
  6. Download the Clementine Remote app by clicking on the following link http://bit.ly/39CTNCo Play store. Now open the app, and you should be seeing a screen as shown in the Image 2 above. Enter your IP address & click on connect.
  7. Now you should be able to remotely access your Clementine music player from your Clementine Remote App

Friday, January 18, 2019

[SOLVED] - Fix Corrupt NTFS Parition In Ubuntu Using ntfs-3g, Without Using Windows OR fsck

Since yesterday, I've been trying to backup my hard drive using Clonezilla but without any success. Twice I got the following error, when I tried to backup my full hard drive by using Clonezilla.

ntfsclone-ng.c: NTFS Volume '/dev/sda6/' is scheduled for  a check or it was shutdown uncleanly. Please boot Windows or fix it by fsck
& I know why this issue has cropped up. Few days back I used GParted to expand my main ext4 partition that has Ubuntu installed on it by using a chunk from another NTFS partition.

 >> SOLUTION:


Here's what worked for me. Open your terminal [CTRL+ALT+T]:

1. First list all the partition in your hard drive.

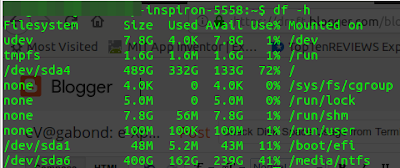
 df -h  

You should be getting a list of parition as shown in the image below. In my case, the NTFS parition is '/dev/sda6.'

[SOLVED] - Fix Corrupt NTFS Parition In Ubuntu Using fsck Without Using Windows
Click on image to enlarge

 2. Now unmount the NTFS partition using the following command. Please note, the command is 'umount' and not 'unmount.'

 sudo umount /dev/sda6  

3. If you do not have ntfs-3g installed, you can install it using the following command:

 sudo apt-get install ntfs-3g  

4. Now run the ntfs-3g command to check/repair your corrupt/problematic NTFS partition:

 sudo ntfsfix -b -d /dev/sda6  
here,
  • b: clear-bad-sectors -- Clear the bad sector list 
  • d: clear-dirty -- Clear the volume dirty flag

5. If the CHECK/REPAIR operation is successful, you should be getting a message as shown in the image below:

Click on image to enlarge
>> REF: Fix corrupt NTFS partition without Windows

Monday, September 3, 2018

[SOLVED] - Thunderbird Could Not Get Password - Fix for Ubuntu/Linux

If you have been getting the following error "Thunderbird Could Not Get Password," and because of this have been unable to log into your Email Account or Send Emails, you can try the solution below that worked for me.

>> Close your Thunderbird Email Client. Goto your Home folder and Press CTRL+H to view hidden folders, or in your Menu, goto View >> Show Hidden Files.

[SOLVED] - Thunderbird Could Not Get Password for Ubuntu
Click on image to enlarge
>> Click on the .thunderbird folder.

[SOLVED] - Thunderbird Could Not Get Password for Ubuntu
Click on image to enlarge
>> Click on the shbh8pem.default folder.

Click on image to enlarge
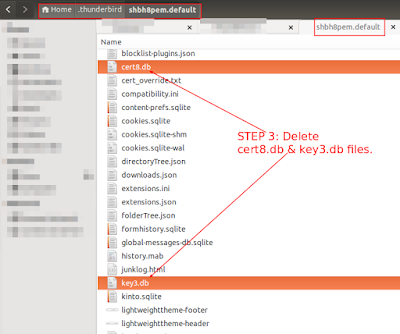
>> DELETE the following two files as highlighted in the image above:
  • cert8.db
  • key3.db 
>> Now OPEN Thunderbird and press F5 to Send/Receive Emails. If it prompts for a password enter it.

>> Try SENDING an Email from. If it prompts for a password enter it.

>> If the above solution doesn't work, RESTART your system, and repeat the steps above.

>> Your problem should have been resolved now.

Sunday, May 27, 2018

Check Disk Space Usage from Terminal in Ubuntu/Linux

To view disk space usage of your partitions/hard drive in your terminal, use the following command:
 df -h  
You should get result as shown in the image below:
Check Disk Space Usage from Terminal in Ubuntu/Linux
Click on image to enlarge

Monday, May 14, 2018

Download Ubuntu 18.04 Bionic Beaver Virtual Disk Image (VDI) File for VirtualBox

I was trying Ubuntu 18.04 today on my VirtualBox, and created this VDI file. Sharing it with all here:

Download Link: Ubuntu 18.04 VDI File
Username: virtualbox
Password: ubuntu1804

NOTE:
  • VB Guest Addition Tool is not installed. So you will have to install it. 
  • Variety wallpaper & Cairo Dock app has been installed as bonus.

Saturday, March 17, 2018

[Solved] - Install PHP 7.0, PHP 7.1 or PHP 7.2 in Ubuntu 14.04

After trying a couple of packages, settings and configuration, the solution below is finally what worked for me:

1. Update your PPA repository with the  PHP 7x package sources:

 sudo add-apt-repository ppa:ondrej/php
Press enter to confirm. If you come across any error then you will need to install the python-software-properties first as shown below:

NOTE: The above PPA is a co-installable one, meaning you can install PHP 5.5, PHP 5.6 or PHP 7.0 as per your requirement, and both your old and new versions of PHP can co-exist without you having to remove the old version.
 sudo apt-get update  
 sudo apt-get install python-software-properties  

2. Update

Once again update your packages:
 sudo apt-get update  

3. Install PHP 7.x and its relevant mods:

For PHP7.0: sudo apt-get install php7.0 php7.1-mbstring php7.0-mcrypt php7.0-mysql php7.0-xml php7.0-curl php7.0-intl php7.0-soap php7.0-zip php7.0-gd
For PHP7.1: sudo apt-get install php7.1
For PHP7.2: sudo apt-get install php7.2

4. Disable PHP 5.5 or 5.6:

Now this step is very important else you won't be able to use PHP 5.6. Even when you check your PHP version, it will still display as PHP 5.5. Follow the step below to disable PHP 5.5.

 sudo a2dismod php5
 or
sudo a2dismod php5.6

5. Enable PHP 7.x:

Note: Replace x with 0, 1 or 2, depending upon the version you want to install
 sudo a2enmod php7.x  

6. Restart Apache web server:

 sudo service apache2 restart  

Note: New location of php.ini file in PHP 5.6:

The location of php.ini fie is changed from PHP 5.6 onwards, unlike PHP 5.5 where it used to be located at '/etc/php5/apache2/php.ini'; the new location is at '/etc/php/7.x/apache2'

Tuesday, March 13, 2018

[SOLVED]-Remove AppImage Desktop Integration


To remove the desktop integration for your AppImage, follow the instruction below:

Since an AppImage is not "installed", you don't need to "uninstall" it. Just delete the AppImage file and the application is gone. Additionally you may want to remove menu entry by deleting the desktop file from $HOME/.local/share/applications/.

Source:
  1. How can I uninstall an AppImage?
  2. How To Use AppImage in Linux [Complete Guide]
  3. AppImage Website

Monday, February 12, 2018

[SOLVED] - Flush/DNS Cache in Ubuntu 14.04, 15.04 & Others


I tried various solutions and fixes available to clean my system's DNS cache but nothing worked for me, due to which I was unable to access a particular website. But at the same time, when I turned on my VPN and tired to access that website, I was able to do so. This clearly meant that there was a problem with my DNS cache. Eventually I tried this simple fix and then was able to access that website. So here's the solution:

1. First you need to find the IP address of your website. To do that open your terminal by pressing CTRL+ALT+T and enter the following command:

 ping example.com  

You should be getting the following result, as shown in the image below:


Make note of the value that I have underlined and circled using the color red; that's your website's IP address. In my case I pinged google.com and got the IP as 172.217.160.14.

2. Now enter the following command in your terminal.

 sudo gedit /etc/hosts  

This will open your system's host file. In this file, look for an entry with the IP as  127.0.0.1 or 127.0.1.1 or something similar to that, but make sure the IP is starting with 127. Now, just below this entry, enter the IP address you got after pinging your website. In my case since I'd pinged google.com I will enter the value in my host file as:

 172.217.160.14  google.com  

Finally save the file and close it. And now you should be able to access your website. Finally after a period of 12 or 24 hours do not forget to remove the above entry from your host file, as it will no longer be required.

Friday, January 26, 2018

[SOLVED] - Remove/Fix Broken tlp-rdw Packages

While trying to Update/Upgrade your Ubuntu system, if you have been running into errors as below:

 Preparing to unpack .../tlp-rdw_1.1-1~trusty_all.deb ...  
 dpkg-maintscript-helper: error: last version is missing  
 dpkg: error processing archive /var/cache/apt/archives/tlp-rdw_1.1-1~trusty_all.deb (--unpack):  
  subprocess new pre-installation script returned error exit status 1  
 dpkg-maintscript-helper: error: last version is missing  
 dpkg: error while cleaning up:  
  subprocess new post-removal script returned error exit status 1  
 Errors were encountered while processing:  
  /var/cache/apt/archives/tlp-rdw_1.1-1~trusty_all.deb  
 E: Sub-process /usr/bin/dpkg returned an error code (1)  

And would like to remove the broken tlp-rdw packages, you can try the solution below. First open your terminal (CTRL+ALT+T) and enter the following command:

 sudo dpkg --remove --force-remove-reinstreq tlp tlp-rdw  

After running the above command you might get a warning message suggesting you run the purge command. To run purge enter the command below:

 sudo apt-get purge tlp tlp-rdw  

Please visit this link if you would like to know about TLP in detail: http://bit.ly/2ncwA3Y

Saturday, January 6, 2018

Install & Use SP Flash Tool in Linux/Ubuntu Systems

>> Download Links:

 You can also follow the tutorial here: http://bit.ly/2lWjFlj, and I strongly recommend you to follow the steps there. Below, I will point out the main step you have to note, from the above tutorial, for a successful installation, and that step is Step 4 which reads as follows:

"Now we come to the interesting part, which cost me 2 weeks of (futile) research and frustration. Finally I found Sergio Riveros tutorial on mibqyyo. Thanks to him again and again and again for this priceless piece of information.

Quote:
"The 'modemmanager' package integrated by default within Linux Ubuntu 14.04 and later is not compatible with the MTK Flash Tool for Linux."

To put it in different words: The modem manager controls port /dev/ttyACM0 and disables the Flash Tool. So we blacklist it for the two MTK vendor IDs the flash tool uses:
 sudo gedit /etc/udev/rules.d/20-mm-blacklist-mtk.rules  
You insert these two lines:
 ATTRS{idVendor}=="0e8d", ENV{ID_MM_DEVICE_IGNORE}="1"  
 ATTRS{idVendor}=="6000", ENV{ID_MM_DEVICE_IGNORE}="1"  
Save the file, exit and restart udev:
 sudo service udev restart  
Switch your phone on (fastboot mode will suffice) and off again."

 >> Watch the video below to learn how to use the SP Flash Tool in Linux:


For list of SP Flash Tool - Errors, their meanings and how to resolve them, you may check the following link: http://bit.ly/2CDWbvT.

[SOLVED] - Flash Lenovo A7700 Stock ROM & Other MTK Phones Using SP Flash Tool

Recently my Lenovo A7700 mobile phone started crashing and giving various problems. Often, it would prompt messages such as "Google Service Framework has stopped working" or "Unfortunately, Google Play services has stopped" and lots of other errors, which eventually would cause the phone to crash. The only solution that would make the mobile functional again was to remove the battery and start the phone.

Then I tried flashing my phone with Stock ROMS & Custom ROMS hoping to resolve my problem. In the process I came across some interesting tools like SP Flash Tool, SN Write Tool etc. The tutorial below explains the working steps to successfully operate the SP flash tool.

Using SP Flash Tool, I have successfully flashed my phone in both Windows and Linux. In this post I will explain how to flash your Lenovo A7700 in Linux/Ubuntu. This same method can be used for flashing various other MTK based Android phones. Also find below the download links for SP Flash Tool, SN Write Tool & stock firmware for Lenovo A7700.

>> Download Links:


>> To install SP Flash tool in Linux, and to learn how to use it, please check this link: http://bit.ly/2qu5n15


Please refer to the video above to get an overview of the overall flashing procedure, and use the steps below for crosschecking your steps, and as further reference.

Step 1: Open your SP flash Tool as shown in the video above.

Step 2: Load your 'scatter.txt' file.

Step 3: Select 'Download Only' and then click on Download.

Step 4: Now turn off your phone and don't remove the battery if your are trying to flash the Lenovo A7700. In others you might have to, you can do trial and error and confirm.

Step 5: Now press the Volume Down button and connect your USB data cable to your phone and your computer.

Step 6: The flashing process should start now as shown in the video above.

For a list of SP Flash Tool - Errors, their meanings and how to resolve them, you may check the following link: http://bit.ly/2CDWbvT.

Friday, December 29, 2017

[SOLVED] - Screen Brightness Resetting To Maximum Value After Every System Restart/Boot

You could try adding a line to /etc/rc.local that will set the desired brightness level. To edit the file, run

 sudo -H gedit /etc/rc.local  
and add the following

 echo X > /sys/class/backlight/intel_backlight/brightness  
so that the end result looks like this

 #!/bin/sh -e  
 #  
 # rc.local  
 #  
 # This script is executed at the end of each multiuser runlevel.  
 # Make sure that the script will "exit 0" on success or any other  
 # value on error.  
 #  
 # In order to enable or disable this script just change the execution  
 # bits.  
 #  
 # By default this script does nothing.  
 echo X > /sys/class/backlight/intel_backlight/brightness  
 exit 0  
Substitute X by the desired brightness level.

PS: Alternatively, there may be /sys/class/backlight/acpi_video0/brightness instead of the above. Brightness levels vary wildly, and may range from 0 to 10 or to 1000. To find the maximum value, try

 cat /sys/class/backlight/acpi_video0/max_brightness  
or
 cat /sys/class/backlight/intel_backlight/max_brightness  

Source: https://askubuntu.com/questions/151651/brightness-is-reset-to-maximum-on-every-restart

Wednesday, November 15, 2017

How to Find/Edit Location/Path of php.ini File in your Ubuntu/LAMP Setup

In some cases, you might have two PHP configuration files: one for the PHP command line and for the web server. If so, make the change in both php.ini files.

1. To Edit web server's php.ini file


Open any text editor of you choice like Gedit and Copy/Paste the following PHP code and Save the file as 'info.php' inside the Document Root folder of your Web Server. Usually the path to your Document Root should be something like '/var/www/html/'. Make sure to save your file under the 'html' folder.

 <?php   
 phpinfo();   
 ?>  

Now access this file from a browser using the following URL: http://localhost/info.php

You should be seeing a page open as shown in the image below. The path to your 'php.ini' file will be under Loaded Configuration File. In my case the path was as follows: Loaded Configuration File    /etc/php/5.6/apache2/php.ini

How to Find/Edit Location/Path of php.ini File in your Ubuntu/LAMP Setup
Click on image to enlarge


2. To Edit CLI's 'php.ini' file


Open your Terminal (CTRL+ALT+T) and enter the following command:
 php --ini  

You should get output as shown in the image below. Here too you should be looking for the Loaded Configuration File path. In my case it was /etc/php/5.6/cli/php.ini.

Edit CLI's 'php.ini' file
Click on image to enlarge

Tuesday, November 7, 2017

Restarting Pulse Audio from Terminal

For whatever reason(s), you would like to restart Pulse Audio, the following are the steps that will help you just do that:

In a standard setup running pulseaudio -k restarts the daemon. Nothing else to do.

In case Pulse Audio is not running typing pulseaudio without further options will start the daemon using defaults in /etc/pulse/daemon.conf and /etc/pulse/default.pa.

User-defined settings in 'home/.pulse/ ' or 'home/.config/pulse/' will override system-wide settings.

NOTE: In case of issues it will often help to DELETE these directories before restarting pulseaudio. You can only delete files that were generated at the present date.

For details see PulseAudio Wiki.

Finally to restart PA from your terminal:

 sudo service pulseaudio restart  

If the restart command doesn't work, you can try starting PulseAudio by entering the following command in your terminal:
 pulseaudio  
or

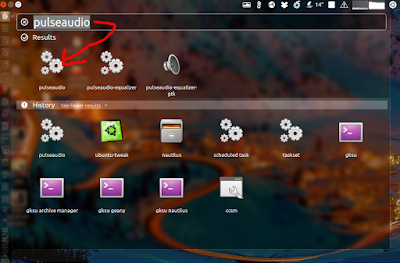
You can also run PulseAudio from the Run Command Prompt in Gnome Shell. First press Alt+F2, and then enter pulseaudio, and finally select pulseaudio as shown in the image below.

Restarting Pulse Audio from Terminal
Click on image to enlarge
Reference: How can I restart pulseaudio without logout?

Suspend Your Ubuntu System From The Terminal

If you would like to suspend your Ubuntu system from the terminal, then use the following command:

 sudo pm-suspend  

Sunday, October 22, 2017

Empty/Delete Trash in Ubuntu Using Command Line/Terminal

If you would like to empty your Ubuntu Trash using command line here's how to do it. Open your terminal (CTRL+ALt+T) and enter the command below:

 rm -rf ~/.local/share/Trash/*  

Tuesday, October 10, 2017

[SOLVED] - Allow Other Users to Access Your Localhost Website In Your LAN

Follow the instructions below, if you would like to allow access to your localhost website amongst your peers in the same Local Area Network:

1. First, you may create a Virtual Host for your local website. To learn how to create virtual host in your localhost, you can go through my following tutorials. If you make use of virtual host then you can use local domain name such as http://wordpress.local or http://drupal.local etc. If you do not make use of localhost then
If you aren't using Virtual Host then you will have to use something like http://192.168.1.1:80/path-to-website. Here:
  • 192.168.1.1 is your local ip. Visit this link to find your local ip: https://goo.gl/NT31td
  • 80 is the port number, which is the port number for http, the port that is used to access your website locally and remotely
 2. Once you have created your Virtual Host then your peers will need to update their host file by adding the lines below:

 127.0.0.1     example.local  

where,
  •  127.0.0.1 needs to be replaced with your local ip
  • example.local needs to be replaced with the virtual host you created for your website
To update your host file check the respective link below :

Check Active Port & Port Numbers In Your Localhost-Ubuntu System

If you would like to know the active/open ports, or in networking terms, which ports are listening and their port numbers in your Ubuntu system, open your terminal and enter the following command:

 sudo nmap -sT -O localhost  

Then you should get output as shown in the image below:

Check Active Port & Port Numbers In Your Localhost-Ubuntu System
Click on image to enlarge

For further reading, you may visit the following page: Verifying Which Ports Are Listening

Sunday, September 17, 2017

Import SQL File from Command Line (CLI)

Here's a simple way to import your SQL file/dump using your Command Line Interface (CLI) or what is also known as Terminal:
 mysql> USE database_name;  
 mysql> source filename.sql;  
You can use this method to import database, also if your database size is very large and your are facing problems importing it from phpMyAdmin.

Top 5 Posts (Weekly)