Search blog

Showing posts with label PHP. Show all posts

Thursday, February 2, 2023

[SOLVED] - Install phpMyAdmin & LAMP on Ubuntu 20.04 Desktop

Install phpMyAdmin & Linux, Apache, MySQL/MariaDB & PHP [LAMP] on Ubuntu 20.04 desktop.

Below you will find the instructions that I myself have tried and successfully implemented on my system.

 1. Install Apache Web Server

 sudo apt update  
 sudo apt install apache2  

2. Install MariaDB

 sudo apt install mariadb-server  
 sudo apt install mariadb-client  

After that, run the commands below to secure the MariaDB server by creating a root password, disallowing remote root access removing anonymous, and more.
 sudo mysql_secure_installation  
 If you've just installed MariaDB, and haven't set the root password yet, you should just press enter here.  
 Enter current password for root (enter for none): PRESS ENTER  
 Switch to unix_socket authentication [Y/n] n  
 Change the root password? [Y/n] n  
 Remove anonymous users? [Y/n] y  
 Disallow root login remotely? [Y/n] y  
 Remove test database and access to it? [Y/n] y  
 Reload privilege tables now? [Y/n] y  
 All done!  

3. Install PHP

 sudo apt install php7.4 php7.4-common php7.4-mysql php7.4-gmp php7.4-curl php7.4-intl php7.4-mbstring php7.4-xmlrpc php7.4-gd php7.4-xml php7.4-cli php7.4-zip  

4. Install phpMyAdmin

 sudo apt install phpmyadmin  

When prompted to choose the web server, select apache2 and continue.
   
Install phpMyAdmin, Apache, PHP, MySQL or MariaDB on Ubuntu 20.04 Desktop

When prompted again to allow web config-common to install a database and configure select Yes and press ENTER.

Then type and confirm a password.

Install phpMyAdmin, Apache, PHP, MySQL or MariaDB on Ubuntu 20.04 Desktop

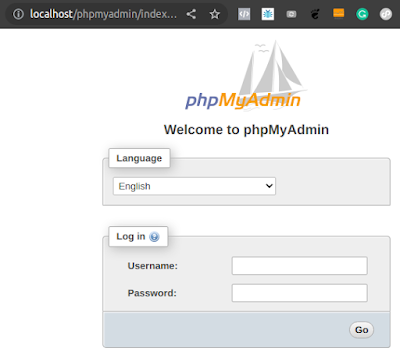
After installing phpMyAdmin, open your web browser and browse to the server hostname or IP address followed by /phpmyadmin.
 http://localhost/phpmyadmin  
Install phpMyAdmin, Apache, PHP, MySQL or MariaDB on Ubuntu 20.04 Desktop
If you encounter the following error implement the solution below to resolve the issue:

ERROR: mysqli_real_connect(): (HY000/1698): Access denied for user 'root'@'localhost'

Open your terminal and run the following commands:
 sudo mysql -u root  
 use mysql;  
 update user set plugin='' where User='root';  
 flush privileges;  
 \q  
Now the LAMP cum phpMyAdmin should be working for you.

>> Ref:

Saturday, March 17, 2018

[Solved] - Install PHP 7.0, PHP 7.1 or PHP 7.2 in Ubuntu 14.04

After trying a couple of packages, settings and configuration, the solution below is finally what worked for me:

1. Update your PPA repository with the  PHP 7x package sources:

 sudo add-apt-repository ppa:ondrej/php
Press enter to confirm. If you come across any error then you will need to install the python-software-properties first as shown below:

NOTE: The above PPA is a co-installable one, meaning you can install PHP 5.5, PHP 5.6 or PHP 7.0 as per your requirement, and both your old and new versions of PHP can co-exist without you having to remove the old version.
 sudo apt-get update  
 sudo apt-get install python-software-properties  

2. Update

Once again update your packages:
 sudo apt-get update  

3. Install PHP 7.x and its relevant mods:

For PHP7.0: sudo apt-get install php7.0 php7.1-mbstring php7.0-mcrypt php7.0-mysql php7.0-xml php7.0-curl php7.0-intl php7.0-soap php7.0-zip php7.0-gd
For PHP7.1: sudo apt-get install php7.1
For PHP7.2: sudo apt-get install php7.2

4. Disable PHP 5.5 or 5.6:

Now this step is very important else you won't be able to use PHP 5.6. Even when you check your PHP version, it will still display as PHP 5.5. Follow the step below to disable PHP 5.5.

 sudo a2dismod php5
 or
sudo a2dismod php5.6

5. Enable PHP 7.x:

Note: Replace x with 0, 1 or 2, depending upon the version you want to install
 sudo a2enmod php7.x  

6. Restart Apache web server:

 sudo service apache2 restart  

Note: New location of php.ini file in PHP 5.6:

The location of php.ini fie is changed from PHP 5.6 onwards, unlike PHP 5.5 where it used to be located at '/etc/php5/apache2/php.ini'; the new location is at '/etc/php/7.x/apache2'

Tuesday, December 12, 2017

isset() Vs empty() in PHP

A Very Nice Video Tutorial Explaining isset() Vs empty() in PHP:


Wednesday, November 15, 2017

How to Find/Edit Location/Path of php.ini File in your Ubuntu/LAMP Setup

In some cases, you might have two PHP configuration files: one for the PHP command line and for the web server. If so, make the change in both php.ini files.

1. To Edit web server's php.ini file


Open any text editor of you choice like Gedit and Copy/Paste the following PHP code and Save the file as 'info.php' inside the Document Root folder of your Web Server. Usually the path to your Document Root should be something like '/var/www/html/'. Make sure to save your file under the 'html' folder.

 <?php   
 phpinfo();   
 ?>  

Now access this file from a browser using the following URL: http://localhost/info.php

You should be seeing a page open as shown in the image below. The path to your 'php.ini' file will be under Loaded Configuration File. In my case the path was as follows: Loaded Configuration File    /etc/php/5.6/apache2/php.ini

How to Find/Edit Location/Path of php.ini File in your Ubuntu/LAMP Setup
Click on image to enlarge


2. To Edit CLI's 'php.ini' file


Open your Terminal (CTRL+ALT+T) and enter the following command:
 php --ini  

You should get output as shown in the image below. Here too you should be looking for the Loaded Configuration File path. In my case it was /etc/php/5.6/cli/php.ini.

Edit CLI's 'php.ini' file
Click on image to enlarge

Sunday, November 12, 2017

Type Juggling and Type Casting in PHP

Type juggling and type casting can be used to change a value's type. While programming, it's important to know the type of the value and use type casting or juggling to convert it to compatible types.

Type Juggling:

When PHP converts a value from one type of value to another, it is called type juggling. PHP does not require (or support) explicit type definition in variable declaration; a variable's type is determined by the context in which the variable is used. That is to say, if a string value is assigned to variable $var, $var becomes a string. If an integer value is then assigned to $var, it becomes an integer.

 <?php  
 $foo = "0"; // $foo is string (ASCII 48)  
 $foo += 2; // $foo is now an integer (2)  
 $foo = $foo + 1.3; // $foo is now a float (3.3)  
 ?>  

Type Casting:

When you explicitly set a type to change the value into another type, it is called type casting. PHP is a loosely typed language and assigns types to variables depending what is assigned to it. Variables coming from get/post and cookies etc are generally cast as strings rather than other types and there are often other times when you need to specifically cast a type in PHP as e.g. an integer.

An example of this in action is as follows, where $foo starts off as a string value and is then cast into an integer:

 $foo = '1';  
 echo gettype($foo); // outputs 'string'  
 settype($foo, 'integer');  
 echo gettype($foo); // outputs 'integer'   

Wednesday, May 10, 2017

Carriage returns in PHP

Carriage return is "\r". Mind the double quotes!

If you want to put a line break in your text, while using PHP, and want to render it correctly in different operating system:
  • Mac: \r
  • Linux/Unix: \n
  • Windows: \r\n

Wednesday, September 28, 2016

Updating PHP 5.5.x with PHP 5.6 or PHP 7.0 in Ubuntu 13.04, 14.04, 15.04

After trying a couple of packages, settings and configuration, finally I seem to have found out a working solution:

1. Update your PPA repository with the  PHP 5.6 package sources:

 sudo add-apt-repository ppa:ondrej/php

Please note the repository is as stated above and not as:

 ppa:ondrej/php5-5.6 because this has been deprecated where the above PPA is a co-installable one, meaning you can install PHP 5.5, PHP 5.6 or PHP 7.0 as per your requirement.

Press enter to confirm. If you come across any error then you will need to install python-software-properties first as shown below:

 sudo apt-get update  
 sudo apt-get install python-software-properties  

2. Update

Once again update your packages:

 sudo apt-get update  

3. Install PHP 5.6 and its relevant mods:

 sudo apt-get install php5.6 php5.6-mbstring php5.6-mcrypt php5.6-mysql php5.6-xml   
 sudo apt-get install php7.0 # for PHP 7.0   
 sudo apt-get install php5.5 # for PHP 5.5   

4. Disable PHP 5.5:

Now this step is very important else you won't be able to use PHP 5.6. Even when you check your PHP version, it will still display as PHP 5.5. Follow the step below to disable PHP 5.5.

 sudo a2dismod php5  

5. Enable PHP 5.6:

 sudo a2enmod php5.6  

6. Restart Apache web server:

 sudo service apache2 restart  

Note: New location of php.ini file in PHP 5.6:

The location of php.ini fie is changed in PHP 5.6 unlike PHP 5.5 where it used to be located at '/etc/php5/apache2/php.ini'; the new location is at '/etc/php/5.6/apache2'

Wednesday, September 14, 2016

Understanding the Difference Between isset(), empty(), is_empty() and unset() functions in PHP

isset() function in PHP: 

As the name suggests the isset() function in PHP checks whether the variable 'is set' or not. To be more clear this is what happens when this function is called:
  •  Returns TRUE if the variable exists; FALSE otherwise. In other words, only variable that don't exist (or, variable with strictly NULL values) will return FALSE in the isset() function. All variable types that have any type of value, whether it is 0, a blank text string, etc. will return TRUE.

empty() function in PHP: 

The empty() function in PHP returns TRUE or 1 in the following cases:
  1. if the variable is undeclared
  2. if the variable is assigned zero. Example $high = 0;
  3.  if the variable is assigned an Empty string or declared NULL. Example: $high= ''; or $high = NULL;

is_null() function in PHP:

As the name suggests, the is_null() function checks whether a variable is NULL or not. This holds TRUE if:
  1. variable is not declared
  2. variable is declared as NULL. Example: $high = NULL;
Note: '' empty string is not NULL because NULL has no memory allocation, as it has nothing to store, but an empty string does.

    unset() 

    You can wipe a variable out of existence using unset().

    Handy Usage: These functions are handy when you need to make sure that the user filled out the appropriate fields in the form.

    Example:

     <?php   
      // Experimenting with isset(), empty() & is_null()   
     // Comment/Uncomment each condition below and test  
      // $high = '';   
      // $high = NULL;   
      // $high = 0;   
      // $high = 'hello';   
      echo '$high = '.$high.'<br />';   
      echo 'isset($high) = '.isset($high).'<br />';   
      echo 'empty($high) = '.empty($high).'<br />';   
      echo 'is_null($high) = '.is_null($high).'<br />';   
      ?>   
    

    >> Last Updated: 2-Mar-2018

    Sunday, January 3, 2016

    Updating PHP & MySQL in Ubuntu 14.04

    1. Updating PHP 5.5 to PHP 5.6

    To upgrade to a newer version of PHP 5.6 on Ubuntu 14.04, you can use Ondřej Surý's PPA. He is one of the Debian maintainers of the php5 package. Also not that this update will overwrite any change you made to your 'php.ini' files. So, I recommend you make a back up of your 'php.ini' file and later on you can use it as a reference file to make changes in your new 'php.ini' file.

    To add the PPA and upgrade your packages, run:

     sudo apt-get install software-properties-common  
     sudo add-apt-repository ppa:ondrej/php5-5.6  
     sudo apt-get update  
     sudo apt-get upgrade  
     sudo apt-get install php5  
    

    1. Updating MySQL 5.5 to MySQL 5.6

     step 1 : take a backup  
     mysqldump --lock-all-tables -u root -p --all-databases > dump.sql  
     step 2 : remove old mysql  
     sudo apt-get remove mysql-server  
     sudo apt-get autoremove  
     step 3 : install new version of mysql  
     sudo apt-get install mysql-client-5.6 mysql-client-core-5.6  
     sudo apt-get install mysql-server-5.6  
     step 4 : restore your data  
     mysql -u root -p < dump.sql  
    

    3. If error after logging into phpMyAdmin:

    If you happen to get an error as below:

    'Your PHP MySQL library version 5.5.46 differs from your MySQL server version 5.6.27.....'

    Run the following commands:

     sudo apt-get remove php5-mysql  
    

    You might have to reinstall your phpMyadmin.

    To reinstall phpMyadmin enter the following commands:

     sudo apt-get install phpmyadmin  
    

    Wednesday, January 14, 2015

    Install and Configure Upload Progress (PECL uploadprogress) on Ubuntu 14.04 / Drupal

    1. INSTALL DEPENDENCIES

     sudo apt-get -y install php5-dev make  
    

    2. INSTALL via PECL

     sudo pecl install uploadprogress  
    

    3. CONFIGURE UPLOAD PROGRESS
    Create a PHP uploadprogress configuration file.

     sudo gedit /etc/php5/mods-available/uploadprogress.ini  
     and add the line below and save your file 
     extension=uploadprogress.so  
    

    4 ENABLE THE PHP UPLOADPROGRESS MODULE

     sudo php5enmod uploadprogress  
    

    5. RESTART APACHE SERVICE

     sudo service apache2 restart  
    

    Unsintall PECL:

    If you would like to uninstal PECL execute the following command in your terminal:

     sudo pecl uninstall uploadprogress  

    Thursday, January 8, 2015

    How to Conceal that you are using PHP on your server to prying eyes?

    I just found this simple technique to conceal that you are using PHP for your sites from tools like wappalyzer and statcounter. Just make the following change in your php.ini file located (Ubuntu 14.04) at /etc/php5/apache2/php.ini. Here's how to do it.

     1. Prest CTRL+ALT+T to open Terminal  
     2. sudo gedit  
     3. expose php = Off  
    
    Reload Apache:
     service apache2 reload  
    

    Top 5 Posts (Weekly)